
- Fade Basics - understanding-fade-haircut-types
- Home Styling Tools - barber-tools-for-fade-maintenance
- Step Guide - how-to-style-a-fade-haircut-at-home
- Common Mistakes - fade-cut-styling-errors-to-avoid
- Pro Barber Secrets - achieving-barber-quality-fade-look
Understanding Why the Fade Haircut Became a Modern Standard
The fade haircut is more than just a style—it’s a statement of precision and confidence. When people search for how to style a fade haircut, they are usually trying to maintain that sharp, clean gradient that barbers carefully craft in the chair. The challenge begins once you step out of the barbershop and try to keep that fresh look at home.
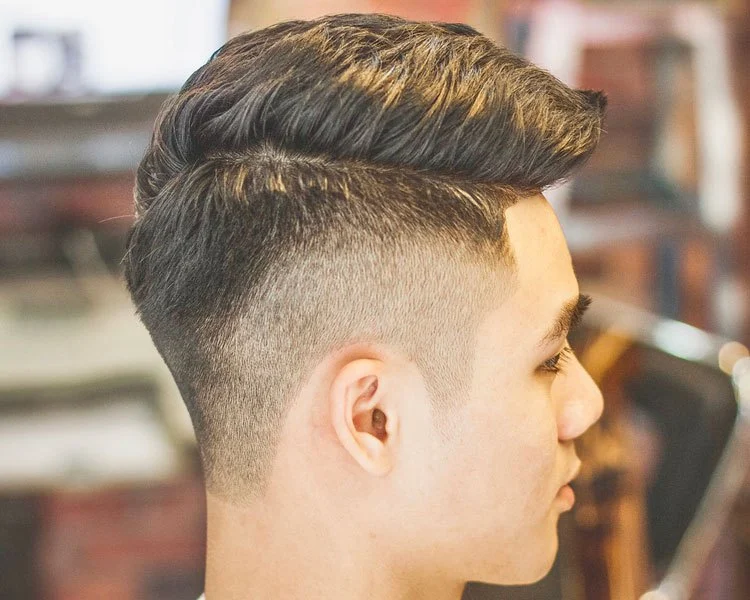
A fade is defined by a smooth transition from very short or shaved hair near the neckline and sides into longer hair on top. Whether it’s a skin fade, low fade, or taper fade, each version requires maintenance to keep its structure clean and intentional.
One barber in Chicago once described a fade as “architecture for your head”—because every line and gradient must stay balanced. Without upkeep, even the best cut can lose its shape within days.

Kat Barber Shop
140 N La Grange Rd Unit 14 (second floor, La Grange, IL 60525, USA
The Essential Tools for Maintaining a Fade at Home
1. Clippers with Adjustable Guards
To maintain a fade haircut at home, quality clippers are non-negotiable. Adjustable guards allow you to blend regrowth without destroying the gradient created by your barber.

Manny’s Barbershop
Manny’s Barbershop, 3358 W Bryn Mawr Ave, Chicago, IL 60659, USA
2. Detail Trimmer for Clean Edges
A trimmer helps maintain sharp outlines around the neckline and temples. This is what keeps a fade looking professional between barber visits.
3. Handheld Mirror Setup
Since fades require symmetry, being able to check the back of your head is essential. Many users underestimate how much uneven blending affects the final look.
4. Styling Products for Finish Control
Light pomades, matte clays, or styling creams help control the top section while keeping the fade visually balanced.
Step-by-Step Guide to Styling a Fade Like a Barber
Step 1: Start with Clean, Dry Hair
Freshly washed and fully dried hair gives you better control. Styling a fade on damp hair can distort the gradient and lead to uneven blending.
Step 2: Refresh the Fade Line Gently
Using clippers with a slightly longer guard than the original cut, gently clean up regrowth along the lower fade area. This step is crucial for maintaining structure without over-cutting.
Step 3: Blend the Transition Zones
The key to professional results is blending. Move upward in small increments, using flicking motions with the clippers. This mimics the technique used in barber fade techniques.
Step 4: Define the Edges
Use a trimmer to sharpen the neckline and sideburns. A clean edge instantly elevates the appearance of the entire haircut.
Step 5: Style the Top for Balance
The top section should complement the fade. A messy top can ruin the contrast, while controlled styling enhances the gradient effect.
Common Mistakes That Ruin a Fade at Home
Overcutting the Fade Line
One of the biggest mistakes is trying to recreate the fade too aggressively. This leads to uneven patches that are hard to fix without professional help.
Ignoring Natural Hair Growth Patterns
Every head has different growth directions. Working against them often results in visible inconsistencies in the fade structure.
Using Too Much Product
Heavy styling products can flatten the natural flow of a fade. Less is often more when aiming for a clean professional look.
How Barbers Create That “Fresh Fade” Look
Professional barbers don’t just cut hair—they sculpt transitions. A true fade is built in layers, starting from the skin and gradually increasing length. This technique ensures that even when hair grows out, it still looks structured.
In a well-known grooming workshop in Los Angeles, a barber demonstrated how small flicking motions create invisible blending lines. This is what separates a basic cut from a professional-grade fade.
Understanding this process helps you replicate similar results at home, even if you are only doing maintenance between appointments.
Real-Life Story: Maintaining a Fade During a Busy Work Week
A marketing professional from New York shared his experience of maintaining a skin fade during long business travel weeks. He couldn’t visit his barber every seven days, so he learned basic skin fade maintenance techniques.
Using a compact clipper and mirror setup, he kept his fade sharp by doing light touch-ups every four days. He noted that the key was consistency—not perfection. Small adjustments prevented the fade from losing its shape.
Over time, he became confident enough to extend his barber visits from every two weeks to nearly a month without losing style quality.
Building Confidence With At-Home Fade Styling
Learning how to style a fade haircut at home is not about replacing your barber—it’s about extending the life of your haircut. With patience and the right tools, you can maintain a sharp, professional appearance between appointments.
Many beginners hesitate at first, but improvement comes quickly with practice. Even small adjustments make a noticeable difference in overall appearance.
For those looking to refine their grooming routine, Cary Hair Guide offers helpful insights, product recommendations, and styling strategies designed to help you achieve barbershop-quality results from home.
Once you understand the structure of your fade, maintenance becomes a simple routine rather than a challenge. The goal is consistency, not perfection—and that’s exactly how professionals keep every cut looking fresh.


 Design Zone Hair Studio4.0 (87 reviews)
 Patrice's Picture of Beauty Hair Salon5.0 (36 reviews)
 hairloution cuts and color0.0 (0 reviews)
 His & Hers Barber and Beauty Salon4.0 (40 reviews)
 Hair Tech Salon4.0 (63 reviews)
 Unique Styles0.0 (0 reviews)
 Best Hair Salon Near Me for Kids and Families: What to Look For
 What Every Woman Should Know Before Getting a Balayage: Experts Explain
 The Best Hair Store Near Me for Long-Lasting Hair Smell Without Being Over-Powering
 Why Low-Maintenance Haircuts Are Trending — And How to Get One at Your Nearby Salon
 How to Fix Hair Breakage Caused by Tight Hairstyles and Ponytails
 The Best Haircuts Near Me for Fine, Limp Hair That Needs Texture Immediately